Jen
Creative Chick  Admin
Admin
Posts: 8,309 
|
Post by Jen on Oct 1, 2009 10:26:01 GMT -6
In this tutorial I'm going to make a glitter heart but you can make anything have glitter words, borders, backgrounds whatever you'd like. This tutorial is just explaining how to make glitter you would not make a glitter heart and then drag it into your signature. To add a glitter heart to a siggy you would create the glitter in the signature's file. To see what your file might look like when adding glitter to a signature see the last post. In Photoshop create a new file 2" x 2" at 100 pixels per inch with a transparent background. Select the custom shape tool from the toolbox. To choose the heart shape click on the shape that's showing in the options bar then choose the heart from the pop up menu. Change the settings in the options bar to the ones in the picture. Now click and drag to make your heart then name the layer heart. Make a new layer and fill it with pink. You can fill a layer with a color by selecting the color from your Swatches palette then choose the paint bucket tool and click down in your file. Name this layer pink glitter. If you have more than one item that will have glitter, for example a name and a frame, and you want each to have different colored glitter then you would make a new layer for each color. 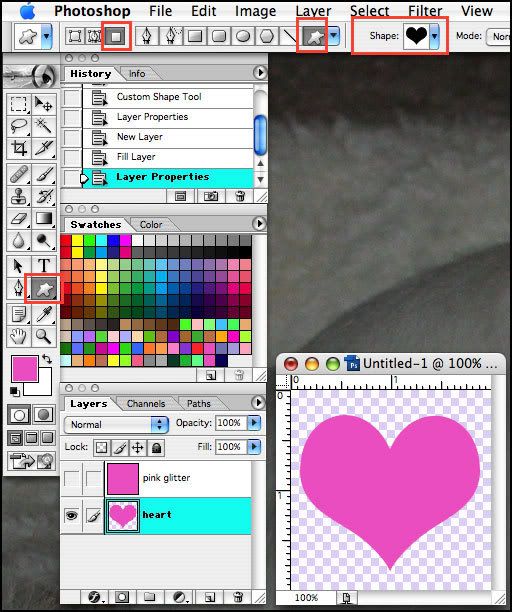 |
|
Jen
Creative Chick
Admin
Posts: 8,309
|
Post by Jen on Oct 1, 2009 10:27:11 GMT -6
When you look at this picture you might think I'm still in Photoshop but I'm actually in ImageReady. I got there by pressing the button located at the bottom of the toolbox, outlined in purple. You can see it says ImageReady in the menu bar. You can jump back and forth from Photoshop to ImageReady with this button. See the thread My Settings to see the ones I used. If you don't see the Options palette, where it says Optimize/Info in the picture, go to Window on the menu bar and choose it. If you don't see all the options in the palette click on the tiny black arrow in the top right corner of the palette, outlined in green, and choose show options. Click on the pink glitter layer to make it active and choose Filter>Texture>Grain... from the menu bar. 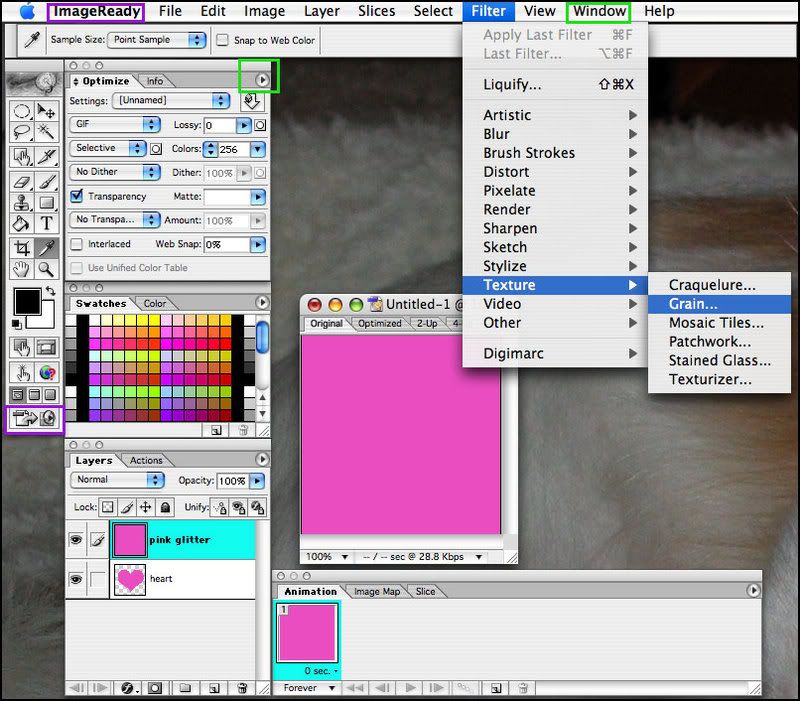 |
|
Jen
Creative Chick
Admin
Posts: 8,309
|
Post by Jen on Oct 1, 2009 10:27:38 GMT -6
Now from the menu bar choose Filter and at the very top you will see Apply Grain, choose this. Whatever was the last filter you used appears at the top. When you make your own glitter you can experiment with different filters to get the texture you want. Some people apply Noise instead of grain. You can also repeat this last step as many times as you'd like. You will see the texture change as you do. 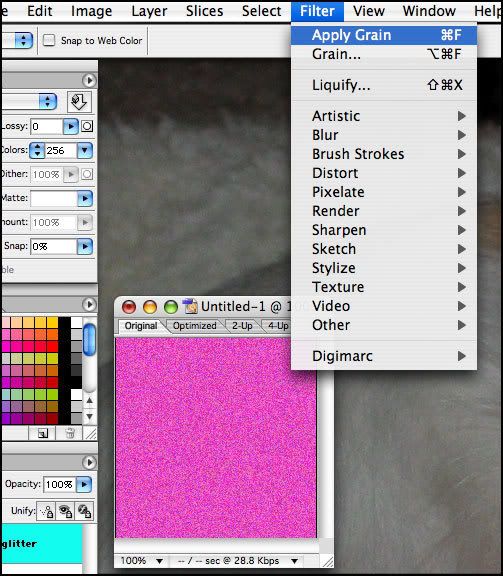 |
|
Jen
Creative Chick
Admin
Posts: 8,309
|
Post by Jen on Oct 1, 2009 10:28:20 GMT -6
Put your cursor where the red arrow is pointing. When you do you should see a pointing hand. Now hold down the control key for a Mac and the command key for Windows and your cursor should change to a pointing hand with a dotted line square next to it. I made one in the picture. While holding down the key that is correct for you click once where the red arrow is pointing and you will see it selects whatever is on that layer, so your heart should be selected like in the picture. Notice that the pink glitter layer and not the heart layer is the active layer. 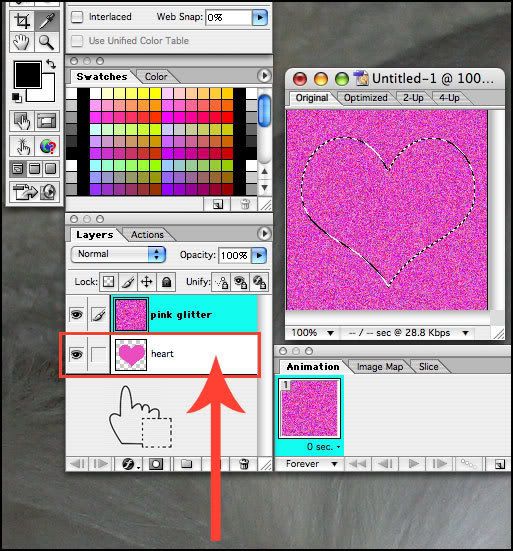 |
|
Jen
Creative Chick
Admin
Posts: 8,309
|
Post by Jen on Oct 1, 2009 10:28:45 GMT -6
With the pink glitter layer as the active layer go to the menu bar and choose Layer>New>Layer Via Copy. Layer 1 should appear. Immediately click on the cross on the layers palette that I have outlined in red. When you do a tiny lock, also outlined in red, will appear on your layer. This locks your layer in place. You do this so the layer doesn't accidentally get moved. With glitter it's very important that all the glitter layers line up or your glitter can shift and look like it's beating. Deselect the heart selection and name Layer 1 1. 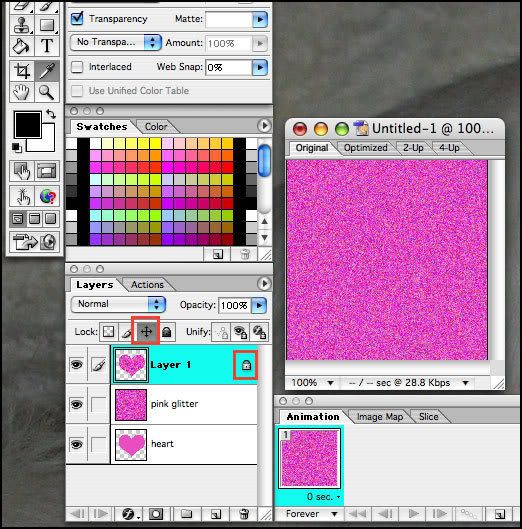 |
|
Jen
Creative Chick
Admin
Posts: 8,309
|
Post by Jen on Oct 1, 2009 10:29:44 GMT -6
Some people use 2 glitter layers but I like to use 3. Click on the pink glitter layer to make it the active layer. From the menu bar choose Edit>Transform>Flip Horizontal. Now you shouldn't be able to tell the difference in your glitter layer but you've just moved the glitter to a new place. Now you're going to repeat what you just did to make layer 1. You're going to make sure the pink glitter layer is the active layer, which means it's highlighted in the layers palette. Then you're going to make the heart on layer 1 a selection. 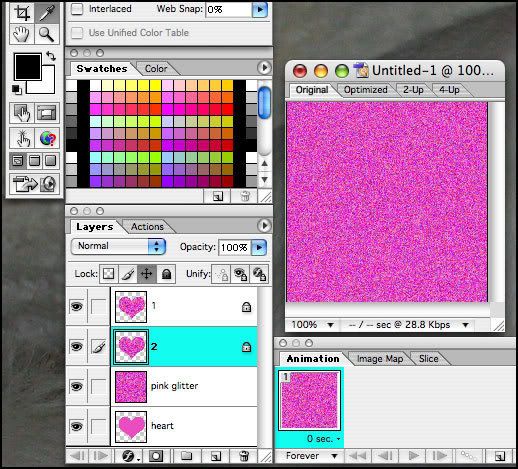 When the heart on layer 1 is a selection choose from the menu bar Layer>New>Layer Via Copy and then deselect the selection. Now click the cross to lock this new layer then name it 2. |
|
Jen
Creative Chick
Admin
Posts: 8,309
|
Post by Jen on Oct 1, 2009 10:30:19 GMT -6
To make the third glitter layer click on the pink glitter layer and choose Edit>Transform>Flip Vertical from the menu bar. Make a selection of the heart on layer 1. With the heart on layer 1 a selection go to the menu bar and choose Layer>New>Layer via Copy. Deselect the selection and lock this new layer like you did with 1 & 2. Name this new layer 3. Since we have our glitter layers made, layers 1, 2 & 3, you can delete the pink glitter layer by dragging this layer to the trash can located at the bottom of the layers palette. Make sure 1, 2 & 3 are all locked. 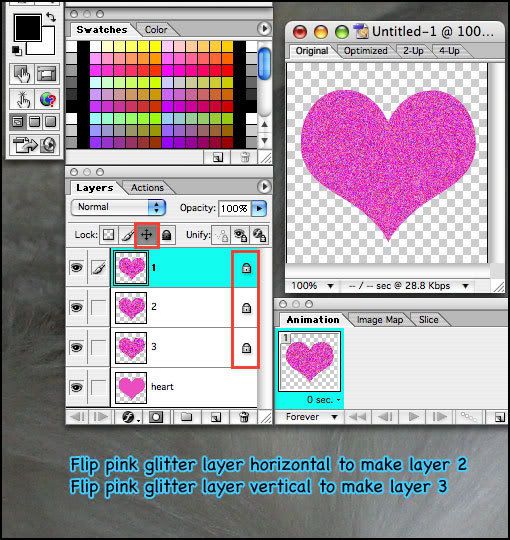 |
|
Jen
Creative Chick
Admin
Posts: 8,309
|
Post by Jen on Oct 1, 2009 10:30:48 GMT -6
If you don't see the Animation palette go to Window in the menu bar and select it. In the Animation palette click on the new frame icon that's to the left of the trash can in the picture below. I've outlined it in red. Click this icon two times to add two frames for a total of three frames. They will automatically be named 1-3. Click on frame 1 so it's highlighted. This is now the active frame in the Animation palette. To show/hide a layer you click on its eye in the layers palette or the empty box where the eye should be. Go to your layers palette and click on layer 1. This layer should have an eye on its layer. Click on the eye on layers 2 & 3 to hide these two layers. Now click on frame 2. Go to your layers palette and make sure 2 has its eye showing and 1 and 3 do not. Finally click on frame 3 then go to the layers palette and make sure 3 has its eye showing and 1 and 2 do not. What you've done is make it so each layer will show when it's corresponding frame is the active frame. If you click on the frames one by one and look at your layers palette you'll see what I mean. 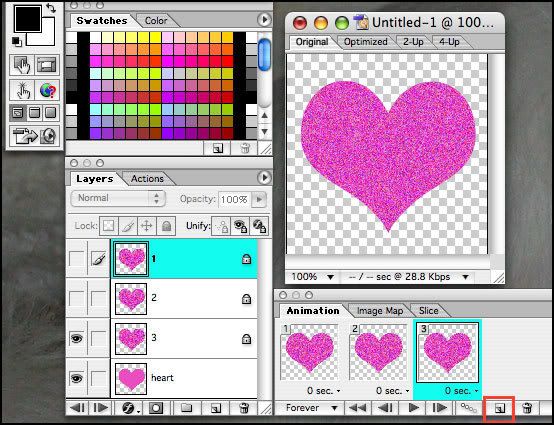 |
|
Jen
Creative Chick
Admin
Posts: 8,309
|
Post by Jen on Oct 1, 2009 10:31:17 GMT -6
Go to your Animation palette and click on frame 1. Now click on the black arrow at the bottom of the frame and choose 0.1 seconds. Repeat this step for frames 2 & 3 so each frame says 0.1 sec at the bottom of the frame. When you do this step it won't look like the picture below because I selected all the frames at once when I set the times. It was easier for me to have you do the frames one at a time. To see your glitter push the play button located at the bottom of the Animation palette. This is the black arrow pointing to the right. 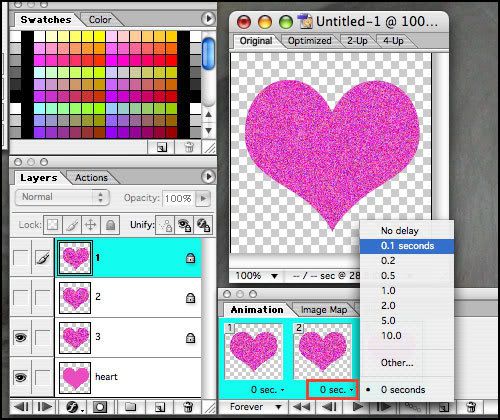 |
|
Jen
Creative Chick
Admin
Posts: 8,309
|
Post by Jen on Oct 1, 2009 10:31:47 GMT -6
To save this file click on the tiny black arrow in the top right corner of the Animation palette, red outline, and choose Optimize Animation... 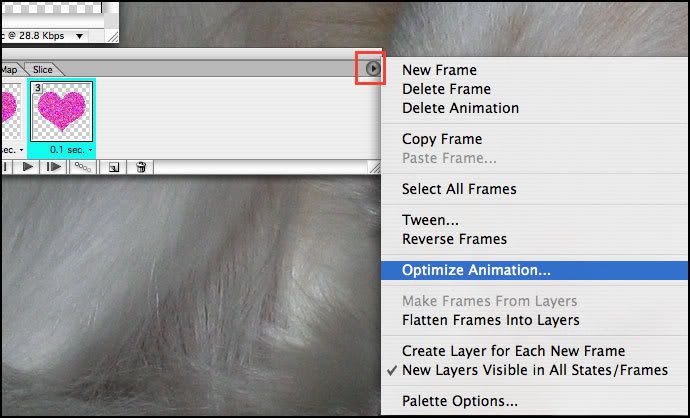 |
|


