Jen
Creative Chick  Admin
Admin
Posts: 8,309 
|
Post by Jen on Oct 1, 2009 10:19:41 GMT -6
From the How To Make Glitter tutorial you not only know how to make glitter but you can also do a few other things you might have seen in people's signatures. Everything was done in ImageReady. As you will see I have already created my three layers of bunny shaped glitter just like you did for the heart in the How To Make Glitter tutorial. You get to the Layer Styles by clicking on the tiny f in a circle at the bottom of the layers palette, outlined in red. In the picture I have chosen Inner Shadow. You will see an effects layers has been added underneath layer 1, it is highlighted in the picture. As long as you don't merge a layer that has a layer effect with another layer you can go back and change the effect's settings as many times as you'd like. To do this just double click on the Inner Shadow layer. The Inner Shadow window you see in the picture is what will pop up when you choose Inner Shadow. I would recommend that you only make changes to the options that I have outlined in purple. To change the color of the shadow just click the box next to the word Color. You can play around with the other options to see the different effects you can get. If you click on the tiny black arrow with the blue background sliders will appear for you to make your adjustments. 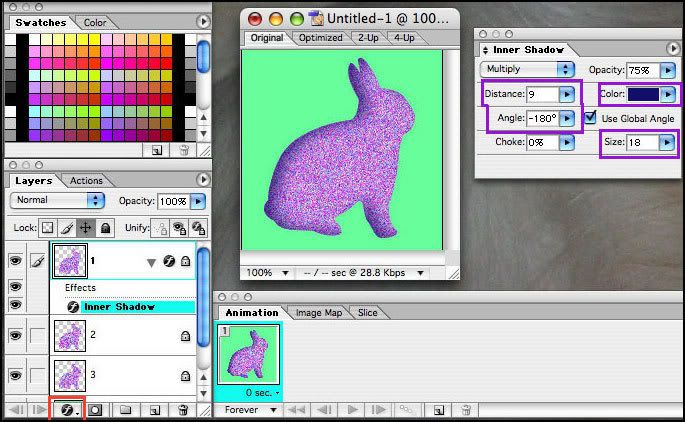 |
|
Jen
Creative Chick
Admin
Posts: 8,309
|
Post by Jen on Oct 1, 2009 10:20:02 GMT -6
When applying a layer effect to one glitter shape layer you need to apply the same layer effect with the same settings to your other two glitter shape layers. So I need to add this Inner Shadow to layers 2 & 3. To do that click and drag your effects layer down. I have outlined in red where you want to click. In the picture I am mid drag that's why you faintly see Inner Shadow over layer 3. If you look at where the arrow is pointing you will see a bold line at the bottom of layer 3 this means when I release the effects layer the Inner Shadow will be applied to layer 3. To practice just click and drag the effects layer up and down and you will see that bold line move from one layer to the next. 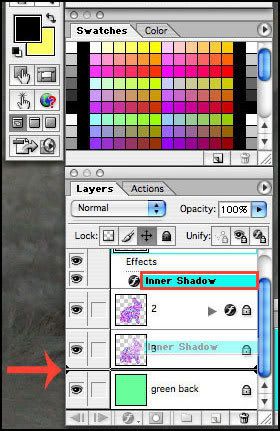 |
|
Jen
Creative Chick
Admin
Posts: 8,309
|
Post by Jen on Oct 1, 2009 10:20:24 GMT -6
Here's how it will look...  |
|
Jen
Creative Chick
Admin
Posts: 8,309
|
Post by Jen on Oct 1, 2009 10:20:45 GMT -6
For this I chose Bevel & Emboss as the layer effect. When the pop up window appears I would recommend you just make changes to two things. Where it says up and down choose one of the two. And where it says Inner Bevel if you click on the tiny arrow with the blue background choose one of those. Again, add this exact layer effect to your other two glitter shape layers. You can also add more than one layer effect to each layer.  |
|
Jen
Creative Chick
Admin
Posts: 8,309
|
Post by Jen on Oct 1, 2009 10:21:07 GMT -6
And now for two simple things that don't involve glitter... For this one I made one layer light pink and another layer dark pink. Make sure you use the same selection to fill these shapes you don't want to make two bunnies with the custom shape tool because just like glitter these two bunny layers need to be lined up exactly to get the effect right. Make a bunny selection and fill it with the light color on one layer and with the same selection make a new layer and fill it with the dark color. Lock the two layers. The only thing you are adjusting is the speed your frames show. This was set at 0.1 seconds for each frame.  |
|
Jen
Creative Chick
Admin
Posts: 8,309
|
Post by Jen on Oct 1, 2009 10:21:27 GMT -6
And finally just super simple animation. You have two choices you can in Photoshop make multiple layers with the bunny in the different positions. Then bring it into ImageReady, make your frames that correspond to each layer, set the speed and you are done. Doing it this way you will be able to see exactly where the bunny moves because you will have him in all the different positions. But I didn't do that. This jump is simple so instead I brought my one bunny shape layer into ImageReady and then I made a new frame and moved him a bit. Made another frame and moved him again. I continued doing this for about 7 frames and then chose the frame speed and I was done. It just depends on which way works for you.  |
|


