Jen
Creative Chick  Admin
Admin
Posts: 8,309 
|
Post by Jen on Oct 1, 2009 21:57:00 GMT -6
Here's the button we'll be making. You can replace the paw with anything you want.  |
|
Jen
Creative Chick
Admin
Posts: 8,309
|
Post by Jen on Oct 1, 2009 21:57:27 GMT -6
Start with a new file 3" x 3" at 100 ppi with a transparent background. Fill the layer with white and name it white back. With the elliptical marquee tool hold the shift key while you click and drag to make a perfect circle. While clicking and dragging to make the selection if you want to move it hold the space bar. If you want to move the selection after it's been made, with a selection tool as your current tool click and drag from inside the selection. 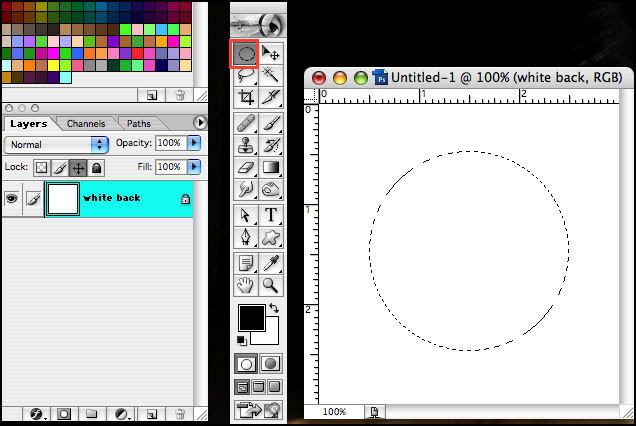 |
|
Jen
Creative Chick
Admin
Posts: 8,309
|
Post by Jen on Oct 1, 2009 21:58:24 GMT -6
Make a new layer and name it rim. Pick a color and fill the selection by holding option + delete for Macs and alt + delete for Windows. Deselect. 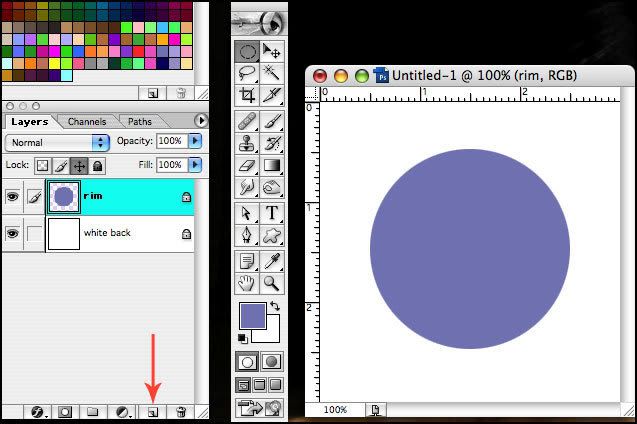 |
|
Jen
Creative Chick
Admin
Posts: 8,309
|
Post by Jen on Oct 1, 2009 21:59:15 GMT -6
To the rim layer apply the Bevel and Emboss effect. To do that click on the tiny f in a circle at the bottom of the layers palette, red arrow, and choose it. 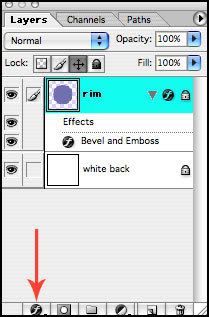 Use these settings. To choose the Peaks Contour click on the arrow in the blue section to the right of the contour that's showing... 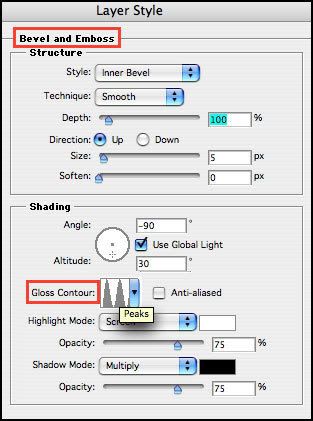 ...and the contour window below will appear. If you hold your cursor over the contours a tiny window with its name will pop up. If you don't see all of these contours click the arrow in the top right corner and load the available sets. 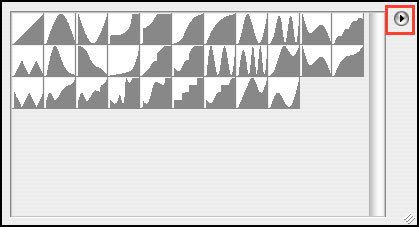 |
|
Jen
Creative Chick
Admin
Posts: 8,309
|
Post by Jen on Oct 1, 2009 21:59:44 GMT -6
Make a new layer and name it button. Put this layer above the rim layer in the layers palette. With the elliptical marquee tool hold the shift key and click and drag to make your selection, yellow arrow. After your selection is made if you need to move it click and drag from inside the selection. 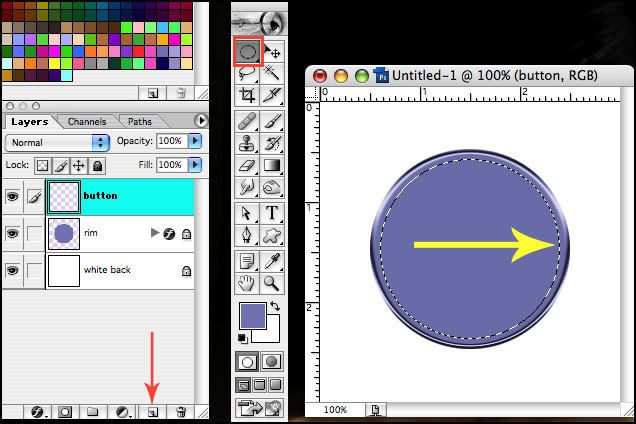 |
|
Jen
Creative Chick
Admin
Posts: 8,309
|
Post by Jen on Oct 1, 2009 22:00:32 GMT -6
To the button layer you're going to apply these effects, red dots. 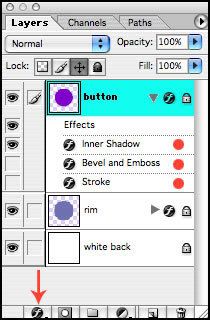 To get the color for the Inner Shadow click on the box filled with color in the Layer Style window. 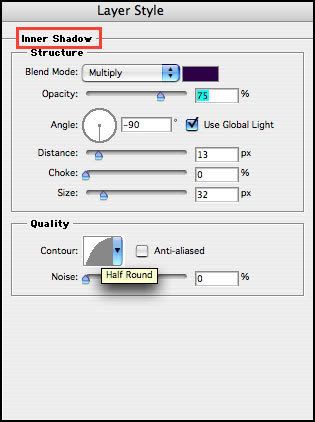 When you do the Color Picker window will appear. Now go to your button, you'll notice your cursor has changed to the eyedropper, and click down on it. I clicked down where the yellow ring is. Now go back to the Color Picker window and drag the white ring straight down until you have a darker version of your color. If you look at the top box, red arrow, it will show you the new color. Click OK when done.  |
|
Jen
Creative Chick
Admin
Posts: 8,309
|
Post by Jen on Oct 1, 2009 22:01:09 GMT -6
Here are the settings for the Bevel and Emboss. 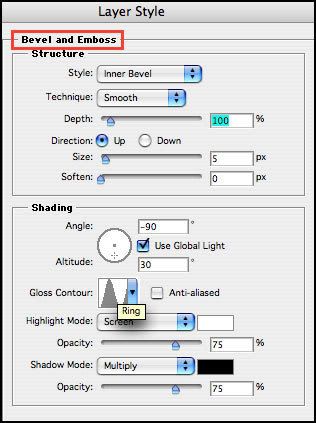 And these are for the Stroke. 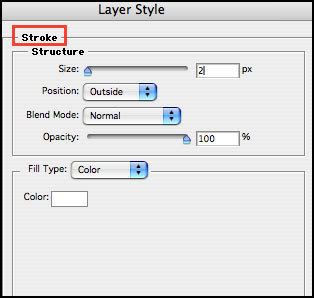 |
|
Jen
Creative Chick
Admin
Posts: 8,309
|
Post by Jen on Oct 1, 2009 22:01:34 GMT -6
Your button should look like this. 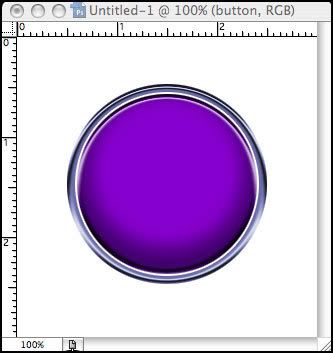 |
|
Jen
Creative Chick
Admin
Posts: 8,309
|
Post by Jen on Oct 1, 2009 22:02:09 GMT -6
Select your custom shape tool.  These are the settings you want in the options bar. To select your shape click on the one that's showing, in this picture that would be the paw. From the pop up window select your shape. If you don't see that many click on the arrow in the top right corner of the window and load your available sets.  |
|
Jen
Creative Chick
Admin
Posts: 8,309
|
Post by Jen on Oct 1, 2009 22:02:36 GMT -6
Make a new layer and name it paw. Put this layer at the top in the layers palette. Make white your foreground color. While holding the shift key click and drag to make your paw print. Use the move tool to put it in the middle of the button. You can use guides like I did in this picture to get it perfectly centered. 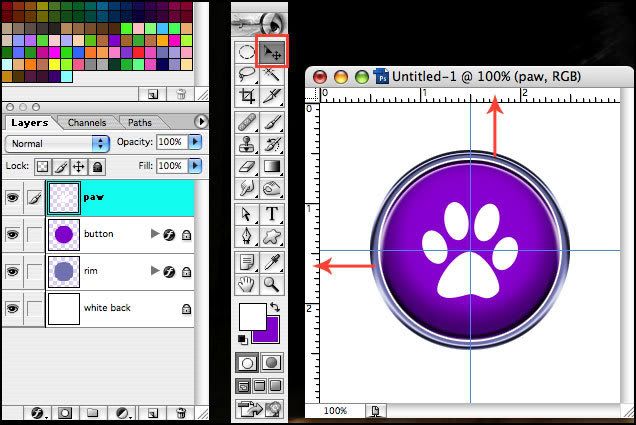 |
|


