Jen
Creative Chick  Admin
Admin
Posts: 8,309 
|
Post by Jen on Oct 2, 2009 14:48:53 GMT -6
Throughout the tutorials I suggest you apply Filter>Sharpen>Sharpen to any pictures you have to reduce for your signature. Here's a trick for using this filter.
|
|
Jen
Creative Chick
Admin
Posts: 8,309
|
Post by Jen on Oct 2, 2009 14:49:16 GMT -6
Here's the picture I started with.  |
|
Jen
Creative Chick
Admin
Posts: 8,309
|
Post by Jen on Oct 2, 2009 14:49:41 GMT -6
Once I reduced the picture in order for it to fit into my signature you can see some of the sharpness was lost.  |
|
Jen
Creative Chick
Admin
Posts: 8,309
|
Post by Jen on Oct 2, 2009 14:50:26 GMT -6
For some pictures applying the Sharpen filter once is enough but for other pictures once isn't enough but applying it twice is too much. I applied the Sharpen filter twice to the picture below and you can see it's more than I needed because Woody's face is looking too bright. 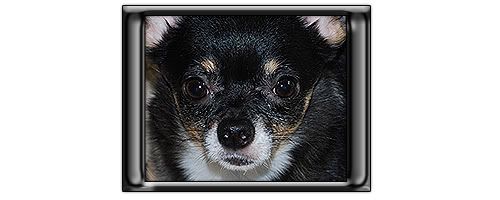 Below is how I want my picture to look. Not too bright but clear.  |
|
Jen
Creative Chick
Admin
Posts: 8,309
|
Post by Jen on Oct 2, 2009 14:51:06 GMT -6
Here's the trick. Apply Filter>Sharpen>Sharpen to your original picture. If you need to apply it a second time that's okay. Basically you want to stop applying the filter right before your picture looks too bright. Make a copy of your picture's layer and put the copy above the original in the layers palette. To the copy apply Filter>Sharpen>Sharpen. It should look too bright. To make your picture look perfect just lower the opacity of the copy's layer stopping when it looks right. 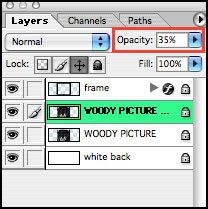 Depending on the picture you're reducing you might only need to apply the Filter>Sharpen>Sharpen to the copy of your reduced image and not the original as well. You'd change the opacity of the copy and then link and merge the copy with the original when it looks right. |
|


