Jen
Creative Chick  Admin
Admin
Posts: 8,309 
|
Post by Jen on Oct 2, 2009 20:02:50 GMT -6
Now repeat replies #4 to #8 for your second picture. 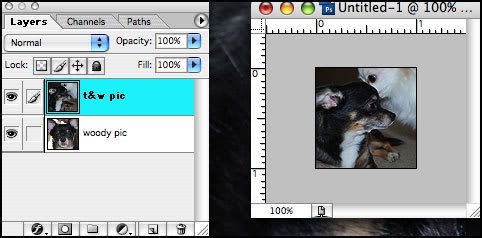 |
|
Jen
Creative Chick
Admin
Posts: 8,309
|
Post by Jen on Oct 2, 2009 20:03:16 GMT -6
Now repeat posts #4 - #8 for your third picture. As a precaution you can now apply the Lock position lock to each of the layers so they don't accidentally get moved. Click on a layer so it's the active layer. Now click on the Lock position lock, red outline. When you do a lock icon will appear on the layer. Repeat these steps to lock the position for the two remaining layers. 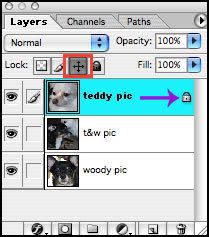 |
|
Jen
Creative Chick
Admin
Posts: 8,309
|
Post by Jen on Oct 2, 2009 20:04:41 GMT -6
*This step is only necessary if you'd like to add a border around your photos. If you don't want a border skip down to reply #14. Select the crop tool.  You're going to click outside your picture, red dot, then drag down at a diagonal. You can continue your drag beyond your picture into the grey border. Release your mouse/lift your pen. You'll see a bounding box has been put around your picture. To apply the crop you can either double click inside the bounding box or click the checkmark in the options bar.  Now to add a border around your photos click the tiny f in a circle located at the bottom of the layers palette and choose Stroke... This will only add a stroke around the teddy pic layer since it's the active layer. 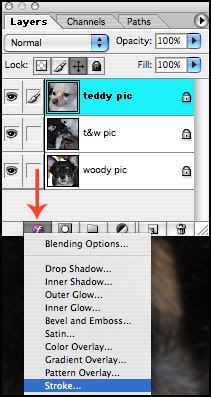 As for the settings for the Stroke these work well with an avatar this size. 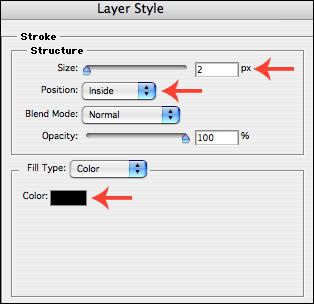 To apply the Stroke to the two remaining layers you can repeat the steps you did for the first layer. Or to see an easier way check out this thread, Adding A Layer Effect To Other Layers. |
|
Jen
Creative Chick
Admin
Posts: 8,309
|
Post by Jen on Oct 2, 2009 20:05:50 GMT -6
For anyone interested here's why you crop the photos before adding a border/stroke. After you've dragged your photo into your avatar's file and then reduced the photo, if you were able to see through the grey part you'd see your entire picture is there. In your file only the section of your photo that appears in the 1" x 1" area of the avatar shows. In the picture below the black line is this section. 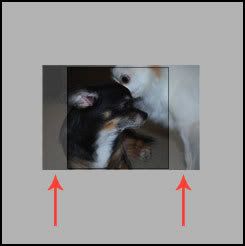 If you applied the stoke before you cropped the photo and could still see through the grey part this is what you'd see. The border might show a little but depending on how large your picture is might not show at all. It definitely won't show evenly in your avatar. 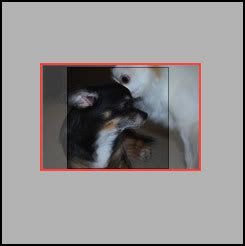 Once you crop your photo the extra section is deleted and all that remains of your photo is what is showing in the 1" x 1" area of your avatar. So now when you add a stroke it goes evenly around your photo. 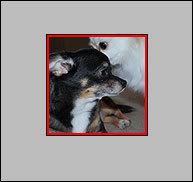 |
|
Jen
Creative Chick
Admin
Posts: 8,309
|
Post by Jen on Oct 2, 2009 20:06:21 GMT -6
Now it's time to go to ImageReady to animate your avatar. Click the button at the bottom of the toolbox.  |
|
Jen
Creative Chick
Admin
Posts: 8,309
|
Post by Jen on Oct 2, 2009 20:07:08 GMT -6
If you don't see the Animation palette when you open ImageReady go to the menu bar at the top and choose Window>Animation. In the animation palette you'll see one frame. The picture in the frame will be the photo that's on the top layer in your layers palette. 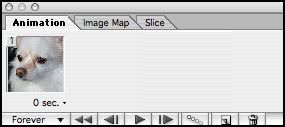 |
|
Jen
Creative Chick
Admin
Posts: 8,309
|
Post by Jen on Oct 2, 2009 20:07:30 GMT -6
Since we're using three pictures in the avatar you'll need a total of three frames. Click the add frame icon twice so you have three frames. 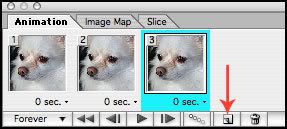 |
|
Jen
Creative Chick
Admin
Posts: 8,309
|
Post by Jen on Oct 2, 2009 20:08:00 GMT -6
In the animation palette click on the second frame. You'll see in the picture below the frame gets highlighted just like when you click on a layer in the layers palette. The reason the teddy pic is showing is because its layer is the top layer and therefore is hiding what's on the two other layers below it. The way to change this is to click on the eye, red outline, on its layer. What will happen is the top layer will be hidden and the t&w pic will be seen. So after you've clicked on the second frame go to your layers palette and click on the eye that appears on your top layer. You should now see the middle layer's photo showing in frame 2.  |
|
Jen
Creative Chick
Admin
Posts: 8,309
|
Post by Jen on Oct 2, 2009 20:08:30 GMT -6
Now in the animation palette click on frame 3. Go to your layers palette and click the eye on the top and middle layers, red outline. What this does is hide the top two layers so you can see the bottom layer. You should now see each of your pictures in their own frame in the animation palette.  |
|
Jen
Creative Chick
Admin
Posts: 8,309
|
Post by Jen on Oct 2, 2009 20:09:10 GMT -6
Now you need to choose how long each picture will show for. At the bottom of every frame you'll see a tiny arrow, red arrow. 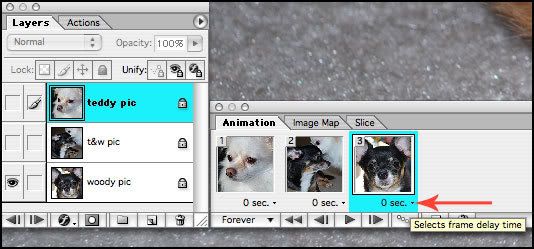 If you click on this arrow a window will pop up with amounts of time you can choose from. You can also set your own time by clicking on Other... For this avatar choose 1.0 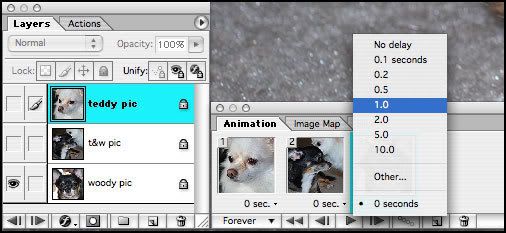 |
|


