Jen
Creative Chick  Admin
Admin
Posts: 8,309 
|
Post by Jen on Oct 2, 2009 22:29:31 GMT -6
Make your button layer a selection. You want your white trim layer to be the active layer, so it should be highlighted. 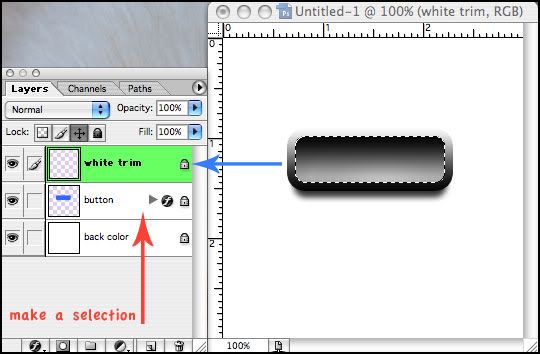 |
|
Jen
Creative Chick
Admin
Posts: 8,309
|
Post by Jen on Oct 2, 2009 22:30:00 GMT -6
In the menu bar choose Select>Modify...>Expand>2. 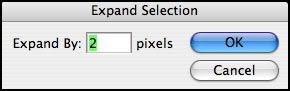 |
|
Jen
Creative Chick
Admin
Posts: 8,309
|
Post by Jen on Oct 2, 2009 22:30:31 GMT -6
Make sure white is your foreground color. In the menu bar choose Edit>Stroke... and use these settings. 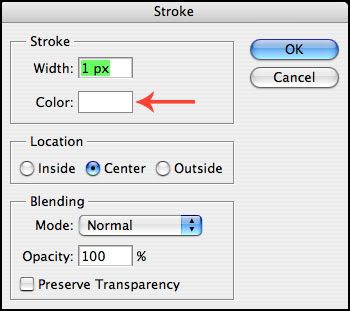 |
|
Jen
Creative Chick
Admin
Posts: 8,309
|
Post by Jen on Oct 2, 2009 22:31:20 GMT -6
Deselect. In the menu bar choose Filter>Blur>Gaussian Blur>0.4.  This is how your button should look. 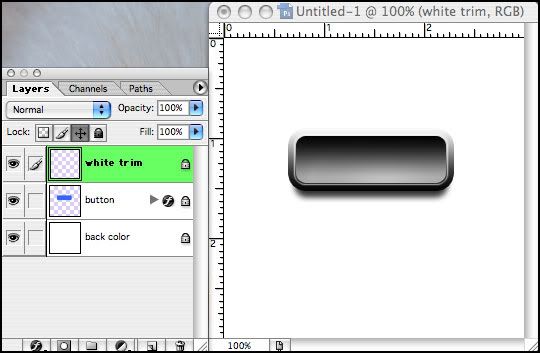
|
|
Jen
Creative Chick
Admin
Posts: 8,309
|
Post by Jen on Oct 2, 2009 22:31:57 GMT -6
With the white trim layer as the active layer, add a Drop Shadow effect to it using these settings. 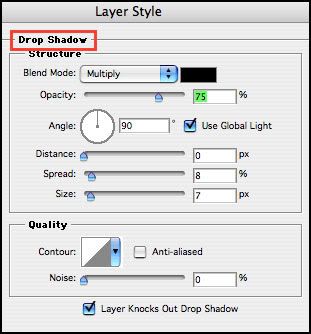 |
|
Jen
Creative Chick
Admin
Posts: 8,309
|
Post by Jen on Oct 2, 2009 22:32:26 GMT -6
Your button should look like this. 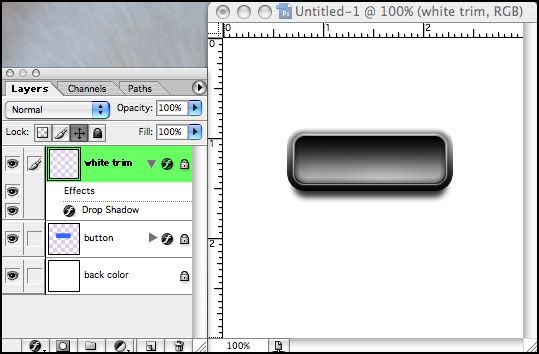 |
|
Jen
Creative Chick
Admin
Posts: 8,309
|
Post by Jen on Oct 2, 2009 22:33:01 GMT -6
Select the Rounded Rectangle Tool again.  In the options bar use these settings.  |
|
Jen
Creative Chick
Admin
Posts: 8,309
|
Post by Jen on Oct 2, 2009 22:33:28 GMT -6
Add a new layer and name it shine. Apply the lock position lock to this layer. In the layers palette change the Blending Mode to Screen. Now click and drag to make your shine's path. 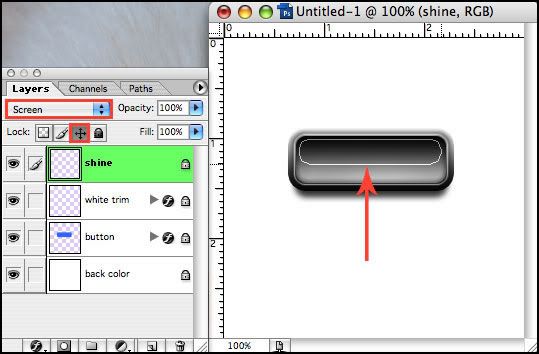 |
|
Jen
Creative Chick
Admin
Posts: 8,309
|
Post by Jen on Oct 2, 2009 22:34:09 GMT -6
Go to your paths palette and click the Load path as a selection button. 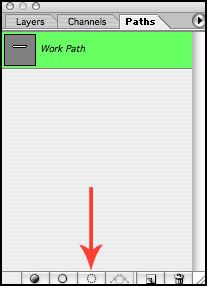 When you do your path will be a selection in your file and the Work Path will shut off in the paths palette. 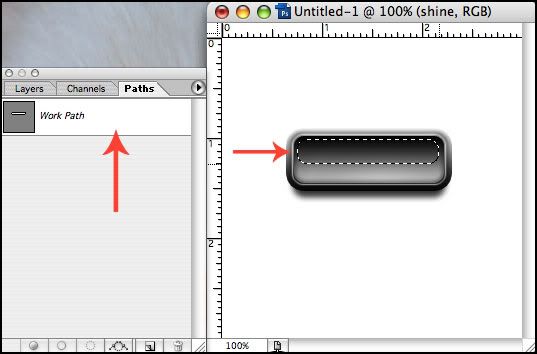 |
|
Jen
Creative Chick
Admin
Posts: 8,309
|
Post by Jen on Oct 2, 2009 22:34:30 GMT -6
Select the gradient tool. In the options bar click the gradient that's showing. In the window that pops up if you let your cursor hover over a gradient its name will appear in a tiny window. Select the Black, White gradient.  |
|


