Jen
Creative Chick  Admin
Admin
Posts: 8,309 
|
Post by Jen on Oct 3, 2009 18:07:17 GMT -6
Throw away the middle ring layer. Make the left ring layer a selection. Now click on the med blue glitter layer and choose Layer>New>Layer via Copy. Deselect and lock this new layer. Name this layer 1. Click on the med blue glitter layer and choose Edit>Transform>Flip Horizontal. Make layer 1 a selection then choose Layer>New>Layer via Copy. Deselect and lock this new layer. Name this layer 2. Click on the med blue glitter layer and choose Edit>Transform>Flip Vertical. Make layer 1 a selection then choose Layer>New>Layer via Copy. Deselect and lock this new layer. Name this layer 3. Move layers 1, 2 & 3 so they are above the left ring layer like you see in the picture.  |
|
Jen
Creative Chick
Admin
Posts: 8,309
|
Post by Jen on Oct 3, 2009 18:07:52 GMT -6
Throw away the left ring layer. Make the right ring layer a selection. Now click on the med blue glitter layer and choose Layer>New>Layer via Copy. Deselect and lock this new layer. Name this layer 1. Click on the med blue glitter layer and choose Edit>Transform>Flip Horizontal. Make layer 1 a selection then choose Layer>New>Layer via Copy. Deselect and lock this new layer. Name this layer 2. Click on the med blue glitter layer and choose Edit>Transform>Flip Vertical. Make layer 1 a selection then choose Layer>New>Layer via Copy. Deselect and lock this new layer. Name this layer 3. Move layers 1, 2 & 3 so they are above the right ring layer like you see in the picture.  |
|
Jen
Creative Chick
Admin
Posts: 8,309
|
Post by Jen on Oct 3, 2009 18:08:31 GMT -6
Throw away the right ring layer. Click on the dk blue glitter layer so it's active. Choose Filter>Texture...>Grain from the menu bar. Then choose Filter again and at the top should be Apply Grain, choose that. For the names I did them both at the same time. I made the Teddy layer a selection and then I put my cursor over the Woody layer and while holding down the command key for Macs and the control key for Windows I then added the shift key as well. This added a plus sign inside the dotted line box of my cursor. Then I clicked once in the Woody layer. Click on the dk blue glitter layer so it's active and choose Layer>New>Layer via Copy. Deselect and lock the layer. Name it 1. Click on the dk blue glitter layer and choose Edit>Transform>Flip Horizontal. Make layer 1 a selection then choose Layer>New>Layer via Copy. Deselect and lock this layer. Name this layer 2. Click on the dk blue glitter layer and choose Edit>Transform>Flip Vertical. Make layer 1 a selection then choose Layer>New>Layer via Copy. Deselect and lock this layer. Name this layer 3.  |
|
Jen
Creative Chick
Admin
Posts: 8,309
|
Post by Jen on Oct 3, 2009 18:09:30 GMT -6
Once I had my three glitter name layers made I put them at the very top of the layers palette. Make sure they are all locked. Click on the top layer in the layers palette, so 1, and add this Inner Shadow to it, purple outline. To do that click the tiny f in a circle located at the bottom of the layers palette and chose it. Change the settings to the ones you see in the Inner Shadow palette, purple outline. To change the color of the inner shadow click where I've added a red outline in the Inner Shadow palette. The Color Picker window will appear. You can change the color by moving the ring and arrows, pink arrows are pointing to them. To get a darker version of your name(s) click down on your name in your file. You'll see with the Color Picker window open your cursor changes to an eyedropper when you do. Now go to the Color Picker window and drag the ring straight down. When happy with the color click OK. I added this Inner Shadow layer effect to all the glitter layers. So every layer named 1, 2 and 3 will have this Inner Shadow. To see how to do this see the thread Adding A Layer Effect To Other Layers.  |
|
Jen
Creative Chick
Admin
Posts: 8,309
|
Post by Jen on Oct 3, 2009 18:10:04 GMT -6
Throw away your name layer, so my Teddy and Woody layers. Here's how all your layers should look. The first 1, 2 & 3's are the glitter names. The next are for the middle ring. Then the left ring. And finally the right ring.  |
|
Jen
Creative Chick
Admin
Posts: 8,309
|
Post by Jen on Oct 3, 2009 18:10:51 GMT -6
Add two frames to the animation palette so you have three frames total. To add frames click on the new frame icon at the bottom of the animation palette. It looks the same as the new layer icon, a piece of paper with a folded corner. In the picture below it's on the left side of the trash can. Click on frame 1 and make sure all the layers named 1 are showing and layers named 2 & 3 are hidden. Click on the eye to hide a layer and click in the empty box to show a layer. Now click on frame 2 and make sure all layers named 2 are showing and layers named 1 & 3 are hidden. This is what you see in the picture. Click on frame 3 and make sure all the layers named 3 are showing and layers named 1 & 2 are hidden. 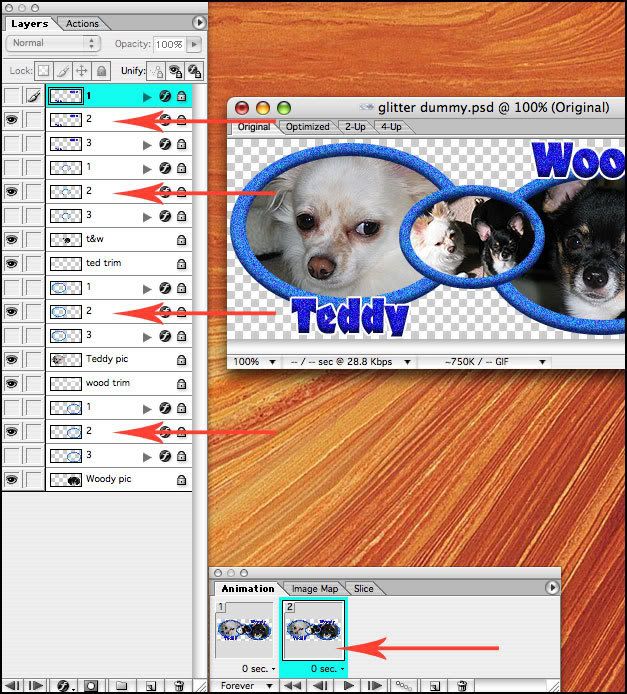 |
|
Jen
Creative Chick
Admin
Posts: 8,309
|
Post by Jen on Oct 3, 2009 18:11:55 GMT -6
One frame at a time click on the tiny arrow the purple arrow is pointing to and set each frame to show for 0.1 sec. Push the play button at the bottom of the palette to see your glitter. If you do see glitter then save this signature by clicking on the arrow in the top right corner of the palette, has a red outline, and choose Optimize Animation...  Make sure these options are checked from the pop up window and hit ok.  Finally from the menu bar choose File>Save Optimized As... Name your file and you are done. |
|


