Jen
Creative Chick  Admin
Admin
Posts: 8,309 
|
Post by Jen on Oct 3, 2009 23:12:19 GMT -6
Here's the signature we will be making...  |
|
Jen
Creative Chick
Admin
Posts: 8,309
|
Post by Jen on Oct 3, 2009 23:14:13 GMT -6
For this tutorial I made the following brushes. I used the elliptical marquee tool to make some circles and then deleted certain parts. I then added a layer under the shape's layer and filled it with white. Then I chose Edit>Define Brush... If you don't want to make these brushes you don't have to just use the elliptical marquee tool to make these shapes when the time comes. To see more on how to make a brush you can check out the tutorial How to make a brush. Rings  Ring  Large Spiral  |
|
Jen
Creative Chick
Admin
Posts: 8,309
|
Post by Jen on Oct 3, 2009 23:16:10 GMT -6
Make a new file 5" x 2" at 100 ppi with a transparent background. Fill the layer with black. To do that make black your foreground color and choose Edit>Fill... with foreground color selected. Name it black back. This is the color I used for this signature. To get this color click inside your foreground color's box in your toolbox. When the Color Picker window pops up enter the settings I put a red outline around and then click OK.  |
|
Jen
Creative Chick
Admin
Posts: 8,309
|
Post by Jen on Oct 3, 2009 23:17:07 GMT -6
Make a new layer and name it oval frame. Use the elliptical marquee tool to make an oval shape. With the gold color as your foreground color choose Edit>Fill... with foreground color selected. Deselect. Now make another oval selection inside your shape like in the picture and choose delete. Deselect.  Apply this layer effect to the oval frame layer. To do that click on the oval frame layer and then click the tiny f in a circle at the bottom of the layers palette. To get the color click where the purple arrow is pointing...  ...and the Color Picker window will pop up. Go to your picture, you will see your cursor has changed to the eyedropper, click down on your ring. Now go to the Color Picker window and grab the ring and drag it straight down until you get to a darker version of the color you started with. In this picture the red arrow is pointing to the ring. The ring's initial location depends on what your foreground color is when the Color Picker window first pops up. When you have your color click OK. 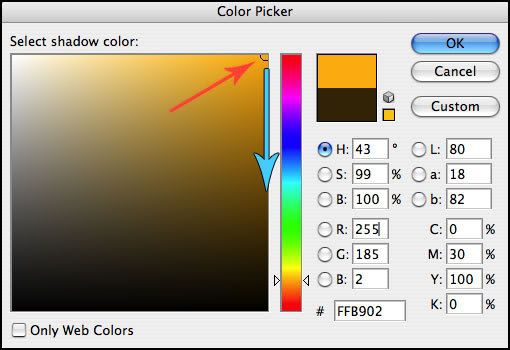 |
|
Jen
Creative Chick
Admin
Posts: 8,309
|
Post by Jen on Oct 3, 2009 23:17:38 GMT -6
Make a new layer and name it border. Take the rectangular marquee tool and make a selection for your border. Choose Edit>Stroke...>1. Deselect. You'll notice in the toolbox once the Stroke window pops up your selected tool automatically switches from the rectangular marquee tool to the eyedropper tool. You can lock your layers as you go, see purple outline.  |
|
Jen
Creative Chick
Admin
Posts: 8,309
|
Post by Jen on Oct 3, 2009 23:18:21 GMT -6
Open your picture file and click and drag the Background from the layers palette over your siggy file and release. Put this layer under your oval frame's layer. Click on your oval frame layer and with the magic wand tool click inside your oval. Choose Select>Modify>Expand>3.  Now click on your picture's layer and choose Layer>New>Layer via Copy. Deselect. I named this layer woody picture. Choose Filter>Sharpen>Sharpen from the menu bar. You can throw away the original picture's layer/Layer 1.  |
|
Jen
Creative Chick
Admin
Posts: 8,309
|
Post by Jen on Oct 3, 2009 23:18:44 GMT -6
Click on your picture layer, so my woody picture layer, and with the lasso tool draw a selection around your pup. Choose Select>Modify>Smooth>1 then Layer>New>Layer via Copy and deselect. I named this layer just woody.  |
|
Jen
Creative Chick
Admin
Posts: 8,309
|
Post by Jen on Oct 3, 2009 23:19:12 GMT -6
Click on your picture layer/woody picture and choose Filter>Blur>Gaussian Blur with this setting...  |
|
Jen
Creative Chick
Admin
Posts: 8,309
|
Post by Jen on Oct 3, 2009 23:19:56 GMT -6
Using this color...  ...take your brush tool and change the Mode in the options bar to Color. Click on your picture layer, so my woody picture layer, then click the lock I outlined in purple in the layers palette. Brush over the layer. Now repeat this for your just (your dog's name) layer, so my just woody layer.  |
|
Jen
Creative Chick
Admin
Posts: 8,309
|
Post by Jen on Oct 3, 2009 23:20:22 GMT -6
Click on your oval frame layer and with the magic wand click inside your oval. Choose Select>Modify>Expand>3. Take your eyedropper tool and click down in a dark area of your pup's picture.  |
|


