Jen
Creative Chick  Admin
Admin
Posts: 8,309 
|
Post by Jen on Oct 4, 2009 10:37:06 GMT -6
Here's the signature we'll be making Here's the site where I got the flowers I used to make my brushes, Free Flower PhotosTo see how to make your brushes check out the tutorial How to make a brush.  |
|
Jen
Creative Chick
Admin
Posts: 8,309
|
Post by Jen on Oct 4, 2009 10:37:30 GMT -6
START With A New File Fill the layer with black and name it black back. Make a new layer and name it flower brushes. With white as your foreground color make your flowers with the brush tool. Make sure the Mode is set to Normal in the options bar. 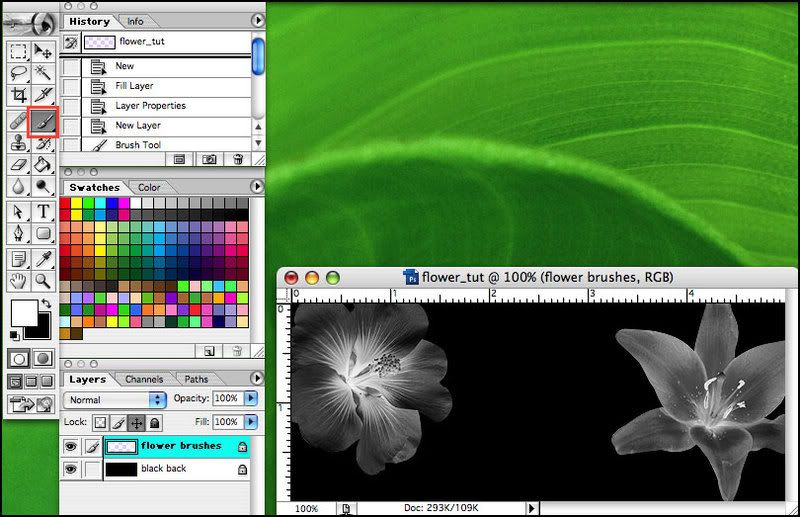 |
|
Jen
Creative Chick
Admin
Posts: 8,309
|
Post by Jen on Oct 4, 2009 10:38:14 GMT -6
This is the brush I used to color the flowers. If you don't have this brush choose a round brush and change the settings to the ones in the picture. 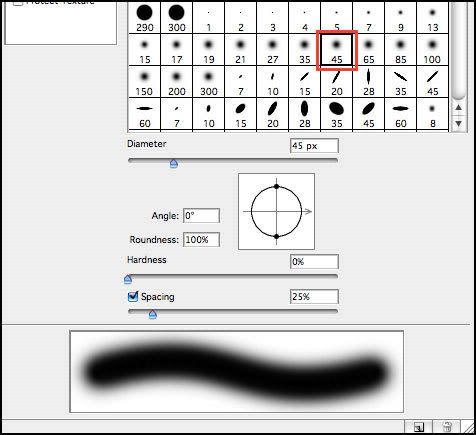 Make a new layer and name it flower color. Set the opacity to 60%. Put this layer under the flower brushes layer. Now color your flowers. It's okay if you go a little outside your flowers with the color. Use the eraser tool to delete any unwanted color that goes outside your flowers. When using the eraser you can set the Mode to Brush in the options bar and choose a small round feathered brush from the brushes palette to delete with. If you find that certain colors are showing too bright at 60% and it's making it difficult to see your flowers you can put those colors on their own layer and then lower the layer's opacity even more. 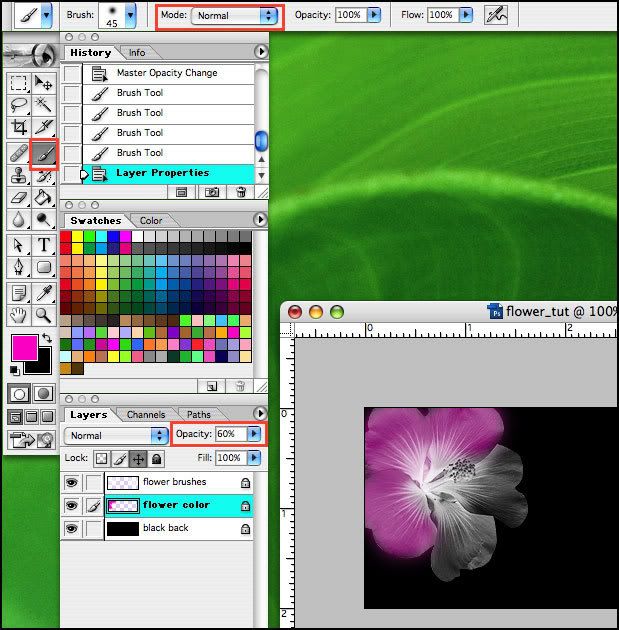 |
|
Jen
Creative Chick
Admin
Posts: 8,309
|
Post by Jen on Oct 4, 2009 10:38:35 GMT -6
When done coloring link and merge the flower brushes and flower color layers. Name the new layer flowers.  |
|
Jen
Creative Chick
Admin
Posts: 8,309
|
Post by Jen on Oct 4, 2009 10:39:09 GMT -6
Make a new layer and name it border. Put this layer under your flowers layer in the layers palette.  With the rectangular marquee tool make a selection. If you need to move the selection click and drag inside the selection. Make white your foreground color and choose Edit>Stroke>Center>1. Deselect.  |
|
Jen
Creative Chick
Admin
Posts: 8,309
|
Post by Jen on Oct 4, 2009 10:39:32 GMT -6
Make a new layer and name it frame. With the rectangular marquee tool make a selection. To subtract from the selection, the inner crawlies in the picture, for Macs hold the option key and for Windows hold the alt key then click and drag inside the first selection. Once you click and drag you can release the appropriate key and now hold the space bar if you need to move the inner selection as you're making it. With black as the foreground color choose option + delete for Macs and alt + delete for Windows to fill the selection. Deselect. 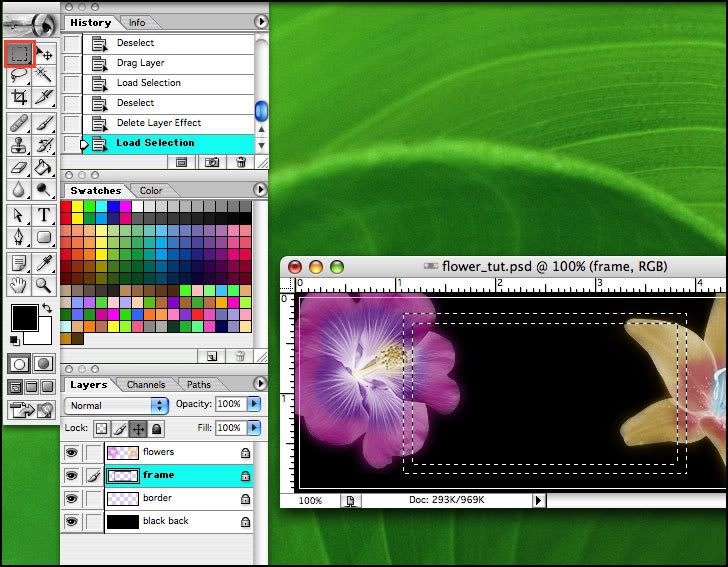 |
|
Jen
Creative Chick
Admin
Posts: 8,309
|
Post by Jen on Oct 4, 2009 10:40:03 GMT -6
Apply this effect to the frame layer. To do that click on the tiny f in a circle at the bottom of the layers palette and choose it. 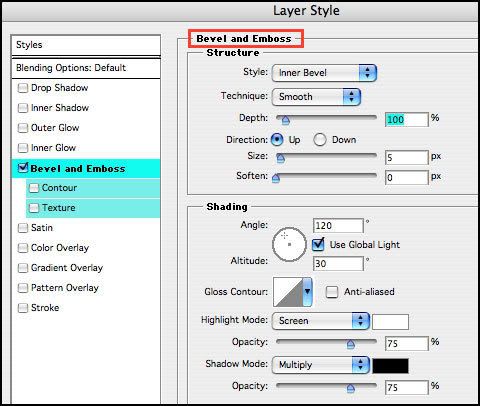 |
|
Jen
Creative Chick
Admin
Posts: 8,309
|
Post by Jen on Oct 4, 2009 10:40:43 GMT -6
Put your picture in the frame. If you don't know how see the thread Putting A Picture Into A Frame. I named this layer T&W picture. You can see in the layers palette I linked this layer with the frame layer so if I wanted to reposition my frame the two layers would move together. 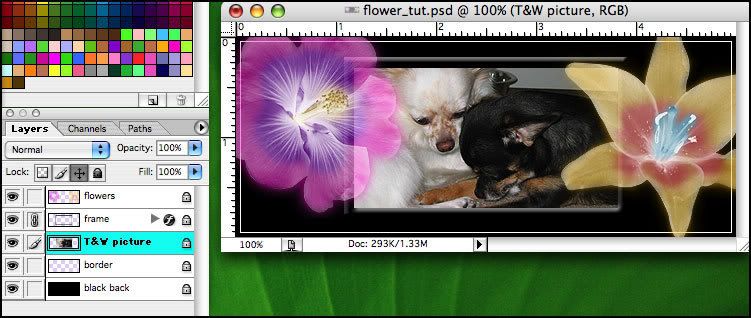 |
|
Jen
Creative Chick
Admin
Posts: 8,309
|
Post by Jen on Oct 4, 2009 10:41:09 GMT -6
Click on the black back layer. For this step I hid the other layers, purple outline, so you could see my lens flares. When I made my flares I had all the layers showing so I could see how they worked with everything in the signature. Choose Filter>Render>Lens Flare... In the pop up window choose the 50-300mm Zoom. If you look in the flare's picture you'll see a tiny cross in the bright spot. If you click and drag the cross you can reposition the flare. 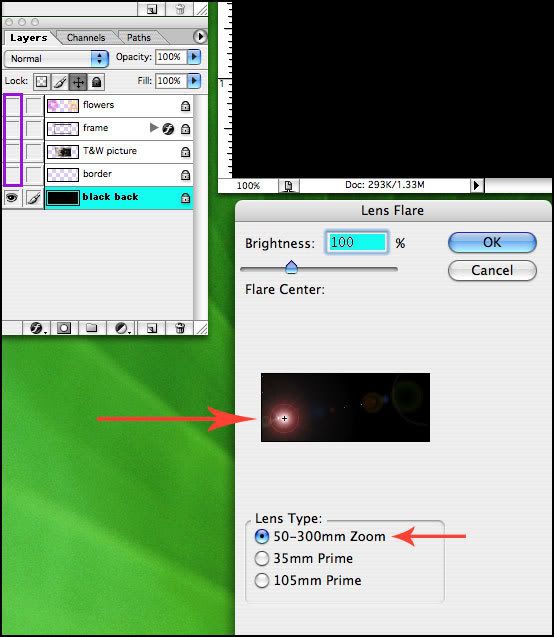 |
|
Jen
Creative Chick
Admin
Posts: 8,309
|
Post by Jen on Oct 4, 2009 10:41:30 GMT -6
Here are my final flares. I applied the filter three times each time placing the bright spot with the tiny cross in a different location. 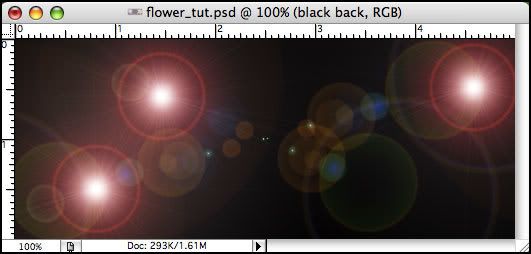 |
|


