Jen
Creative Chick  Admin
Admin
Posts: 8,309 
|
Post by Jen on Oct 4, 2009 10:47:07 GMT -6
This is the signature we'll be making.  |
|
Jen
Creative Chick
Admin
Posts: 8,309
|
Post by Jen on Oct 4, 2009 10:47:45 GMT -6
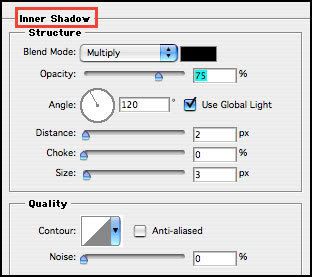
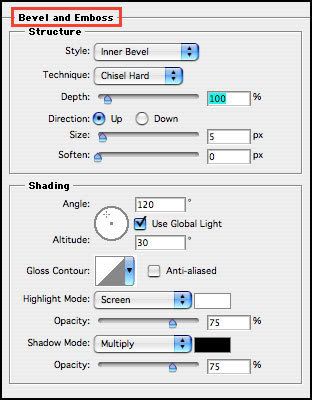
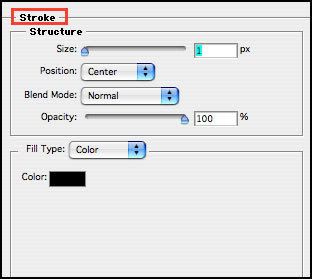
START With A New File Fill the layer with black and name it black back. Bring your photo into your siggy and name the layer picture. Reduce/Enlarge it if needed. You can use the rectangular marquee tool to make it the shape you want by deleting parts of it. Make a selection with the rectangular marquee tool like you see in the picture. If you don't know how check out the thread Frame Selections. With your picture as the active layer choose Layer>New>Layer via Copy then deselect. Name this copy frame and put it above your picture layer. 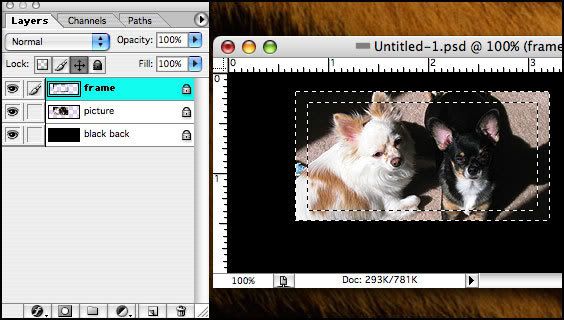 |
|
Jen
Creative Chick
Admin
Posts: 8,309
|
Post by Jen on Oct 4, 2009 10:48:29 GMT -6
Make a new layer and name it granite pattern. Put this layer above the frame layer in the layers palette. Select the paint bucket and in the options bar set the Fill to Pattern. Click on the pattern showing in the options bar and choose this pattern. 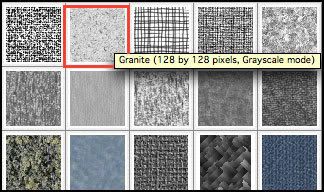 Make your frame layer a selection. With the granite pattern layer as the active layer fill the selection with the pattern by clicking down within the selection then deselect. Change the opacity for the granite pattern layer to 30%. 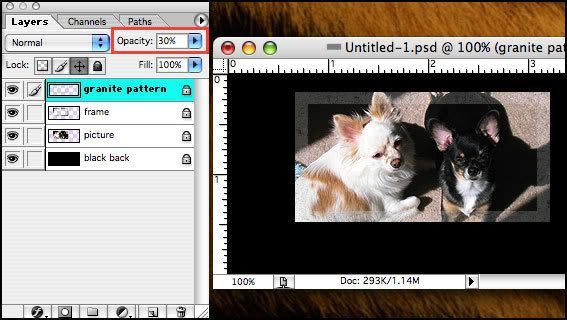 |
|
Jen
Creative Chick
Admin
Posts: 8,309
|
Post by Jen on Oct 4, 2009 10:49:12 GMT -6
|
|
Jen
Creative Chick
Admin
Posts: 8,309
|
Post by Jen on Oct 4, 2009 10:49:36 GMT -6
Make a new layer and name it picture shadow. Put this layer above your picture layer. With the rectangular marquee tool make a selection like in the picture. With black as your foreground color choose option + delete for Macs and alt + delete for Windows to fill the selection then deselect. 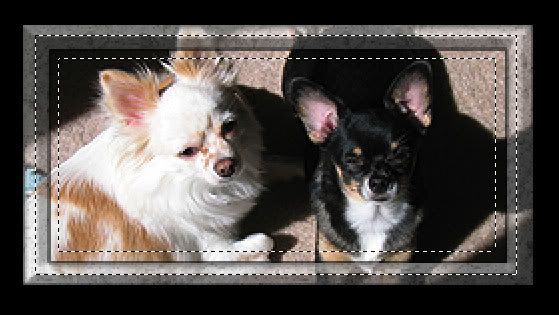 |
|
Jen
Creative Chick
Admin
Posts: 8,309
|
Post by Jen on Oct 4, 2009 10:49:59 GMT -6
Apply Filter>Blur>Gaussian Blur with this setting to the picture shadow layer. Change the opacity for this layer to 65%. 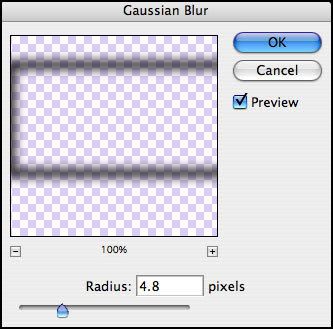 |
|
Jen
Creative Chick
Admin
Posts: 8,309
|
Post by Jen on Oct 4, 2009 10:50:22 GMT -6
Link and Merge the following layers, granite pattern, frame, picture shadow and picture then name the layer frame. Make a copy of the frame layer and choose Edit>Transform>Flip Vertical. With the move tool hold the shift key and drag the copy down.  |
|
Jen
Creative Chick
Admin
Posts: 8,309
|
Post by Jen on Oct 4, 2009 10:50:47 GMT -6
With the frame copy layer as the active layer select the gradient tool. Click on the gradient showing in the options bar and choose the Black, White grad. Now click on the Quick Mask Mode button in the toolbox, red outline. You're going to click and drag where you see the black arrow in the picture. You should see a red mask. 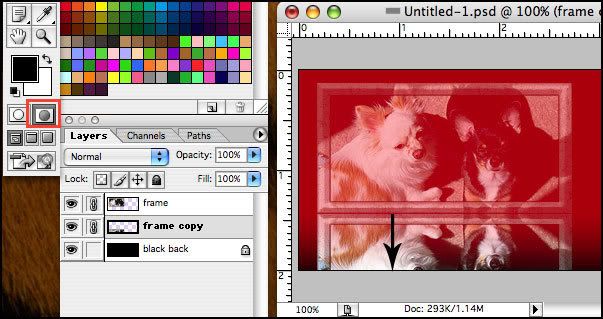 |
|
Jen
Creative Chick
Admin
Posts: 8,309
|
Post by Jen on Oct 4, 2009 10:51:09 GMT -6
Click the button to leave QMM, red outline, and you should see a selection. Choose Layer>New>Layer via Copy then deselect. Name this copy reflection and put its opacity at 20%. Throw away the frame copy layer. 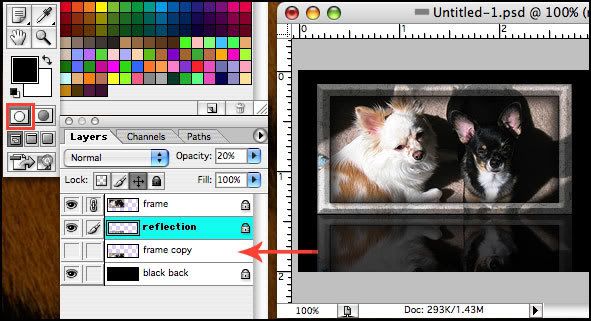 |
|
Jen
Creative Chick
Admin
Posts: 8,309
|
Post by Jen on Oct 4, 2009 10:51:31 GMT -6
Take the type tool and make your name(s). Make a copy of this layer and choose Edit>Transform>Flip Vertical. With the move tool hold the shift key and drag the copy down. Now choose Layer>Rasterize>Type. 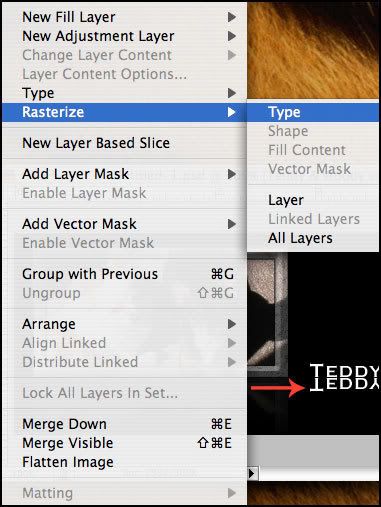 |
|