Jen
Creative Chick  Admin
Admin
Posts: 8,309 
|
Post by Jen on Oct 4, 2009 14:25:33 GMT -6
Here's the signature we'll be making.  |
|
Jen
Creative Chick
Admin
Posts: 8,309
|
Post by Jen on Oct 4, 2009 14:26:16 GMT -6
The pattern I used to go over the gold was made from a paper texture in Painter but you can use the same pattern by copying the picture below to your desktop and then opening it in Photoshop.  With the file open in Photoshop choose Edit>Define Pattern... and then name it Stucco in the pop up window. Click OK. Now if you select the paint bucket from the toolbox and change the Fill to Pattern in the options bar and then click on the pattern showing a window will pop up with the set of patterns you have loaded. You'll see your new Stucco pattern is the last one in the set. If you hold your cursor over a pattern a tiny window with its name will pop up.  |
|
Jen
Creative Chick
Admin
Posts: 8,309
|
Post by Jen on Oct 4, 2009 14:27:36 GMT -6
Here's how you can make the brush I used for the rings. Make a new file 2" x 2" at 100 ppi with a transparent background. With white as your foreground color fill Layer 1 by choosing option + delete for Macs and alt + delete for Windows. Select the custom shape tool from the toolbox.  In the options bar use these settings. To select the solid circle shape you'll be using click on the Shape that's currently showing in the options bar, far right red outline, then choose the solid circle from the pop up window.  Add a new layer and make black your foreground color. Now on Layer 2 click and drag while holding the shift key to make different size circles. 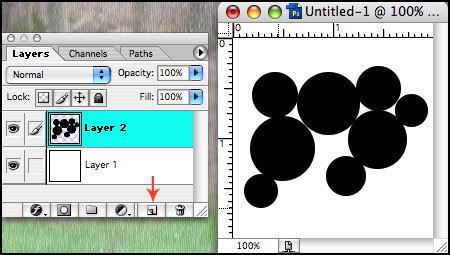 To delete a section from each solid circle take the elliptical marquee tool and while holding the shift key click and drag to make a selection over a circle then delete. To move the selection as you're making it hold the spacebar. If you want to move the selection after you've made it click down within the selection and drag it where you want. When done click down outside the selection to deselect. 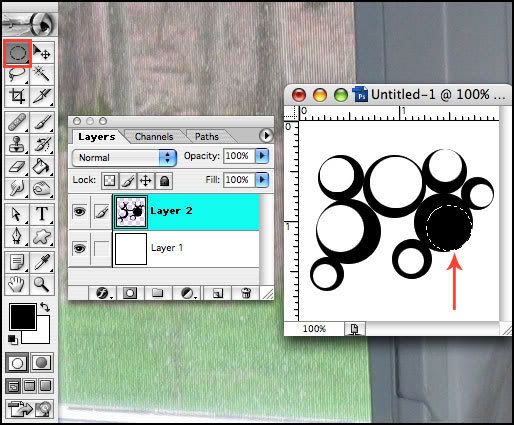 Now choose Edit>Define Brush... then name your brush in the pop up window and click OK. Now if you go to your brushes palette you'll see your new brush has been added to the set. 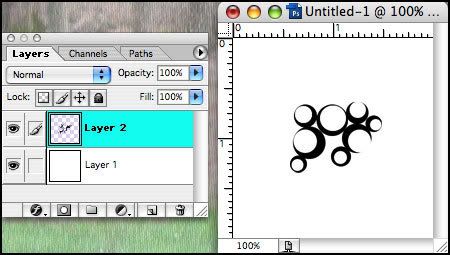 |
|
Jen
Creative Chick
Admin
Posts: 8,309
|
Post by Jen on Oct 4, 2009 14:28:31 GMT -6
Start with a new file. Mine is 5" x 2.5" at 100 ppi with a transparent background. Fill Layer 1 with white by choosing option + delete for Macs and alt + delete for Windows. Then name it texture. Choose Filter>Texturize>Texturizer... and use these settings. 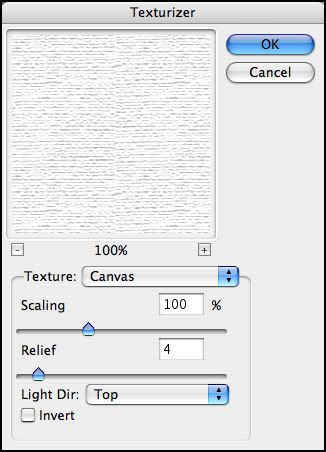 |
|
Jen
Creative Chick
Admin
Posts: 8,309
|
Post by Jen on Oct 4, 2009 14:29:08 GMT -6
To the texture layer apply an inner shadow by clicking on the tiny f in a circle located at the bottom of the layers palette. For the color click on the color box in the Layer style window then in the Color Picker window enter those RGB amounts in the RGB fields. To change the Contour click on the arrow the purple arrow is pointing to. In the window that pops up hold your cursor over a contour and its name will pop up. Click on the Shallow Slope-Valley contour. If it isn't showing click on the arrow in the top right corner of the contours window and load your other contours. 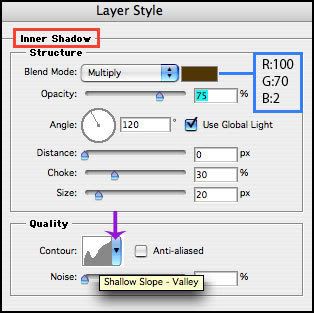 |
|
Jen
Creative Chick
Admin
Posts: 8,309
|
Post by Jen on Oct 4, 2009 14:30:25 GMT -6
Here's how it should look so far. 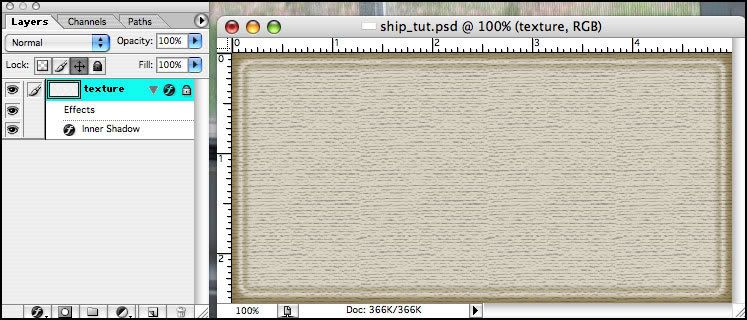 |
|
Jen
Creative Chick
Admin
Posts: 8,309
|
Post by Jen on Oct 4, 2009 14:31:30 GMT -6
Make a new layer and name it relic frame. Place this layer above the texture layer in the layers palette. Select the elliptical marquee tool from the toolbox...  ...then make a selection for your first frame. If you don't know how check out the thread Frame Selections. When your selection is made click on the foreground color in the toolbox and the Color Picker window will appear. 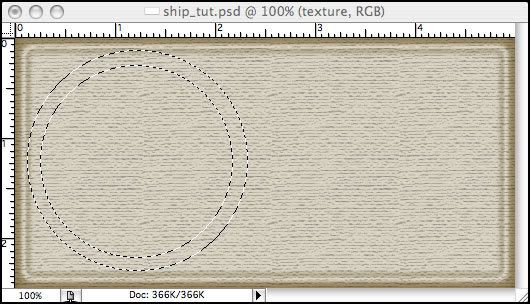 |
|
Jen
Creative Chick
Admin
Posts: 8,309
|
Post by Jen on Oct 4, 2009 14:32:07 GMT -6
In the Color Picker window enter these amounts in the RGB fields then click OK. To fill the selection with this color choose option + delete for Macs and alt + delete for Windows. Deselect when done. 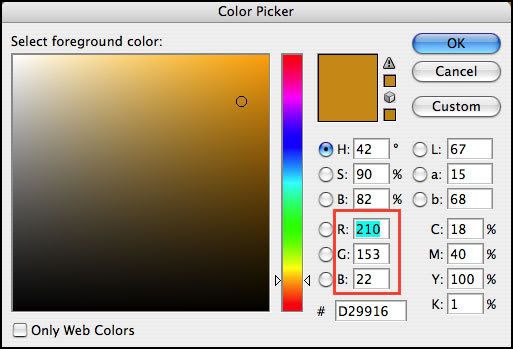 |
|
Jen
Creative Chick
Admin
Posts: 8,309
|
Post by Jen on Oct 4, 2009 14:32:42 GMT -6
Make your second frame selection and then fill it with the same color. Deselect when done. 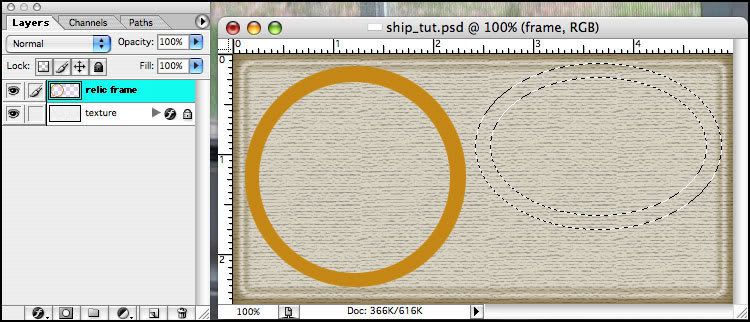 |
|
Jen
Creative Chick
Admin
Posts: 8,309
|
Post by Jen on Oct 4, 2009 14:33:25 GMT -6
Select your brush tool from the toolbox then go to your brushes palette and choose the rings brush that you made. If you need to make your rings brush smaller just change its Diameter in the brushes palette before you use it. Go to the options bar and make sure the Mode is set to Normal. Using the same color you filled your frames with make your rings by clicking down one time for each one. If you're having a hard time getting the rings in exactly the right spot when you click down then you can instead put each ring on its own layer and move it where you want with the move tool. Once in place make sure you link and merge all your ring layers with the relic frame layer before you apply the effects in the next step. If you click and drag the bottom right corner, red arrow, you can extend your file.  |
|


