Jen
Creative Chick  Admin
Admin
Posts: 8,309 
|
Post by Jen on Oct 4, 2009 14:42:45 GMT -6
One at a time open the pictures you want to put into the frames and add them in. If you don't know how see the thread Putting A Picture Into A Frame. Link and merge the two picture layers so you have one layer named pictures. Now add an Inner Glow to the pictures layer... 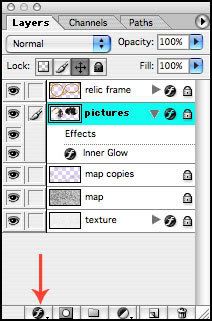 ...with the settings below. You want to use white for the glow so make white your foreground color in the toolbox. Then in the Layer Style window click on the color box. When the Color Picker window pops up go to your toolbox and click down on the foreground color. To change the Contour click on the arrow on the right side of the contour that's showing. In the window that pops up hold your cursor over a contour and its name will pop up. Click on the Cove-Shallow contour. If it isn't showing click on the arrow in the top right corner of the contours window and load your other contours. 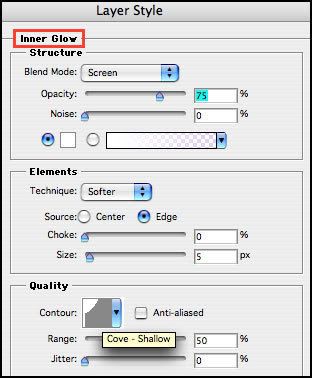 |
|
Jen
Creative Chick
Admin
Posts: 8,309
|
Post by Jen on Oct 4, 2009 14:45:13 GMT -6
Take your type tool and add your name(s). To change the color of your name(s) select the type tool and click in the color box in the options bar. In the Color Picker window enter R:42 G:29 B:0 in the RGB fields. Click OK when done. Now add an Outer Glow to your name(s) by clicking on the tiny f. 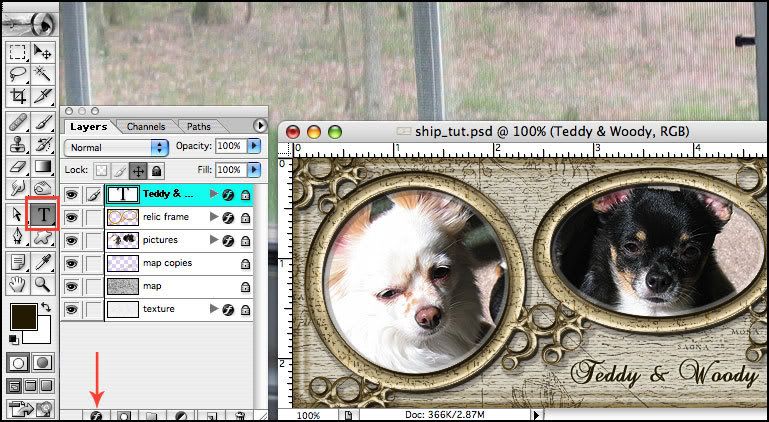 These are the settings you want. The color is the default yellow. I added this so the names would stand out from the background. 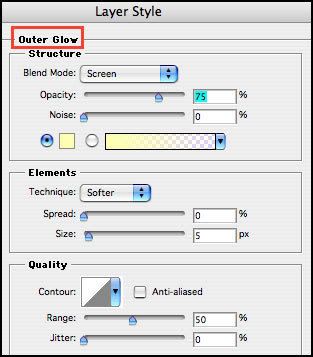 |
|
Jen
Creative Chick
Admin
Posts: 8,309
|
Post by Jen on Oct 4, 2009 14:46:11 GMT -6
Select the custom shape tool.  These are the settings you want in the options bar. To select the directions shape click on the Shape that's showing in the options bar, which in this picture is the shape on the far right.  In the custom shapes window choose the directions shape. 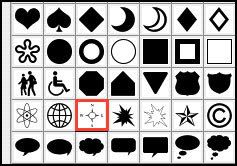 |
|
Jen
Creative Chick
Admin
Posts: 8,309
|
Post by Jen on Oct 4, 2009 14:48:38 GMT -6
Make a new layer and name it directions. Place this layer below your pictures layer in the layers palette. Click on your foreground color in the toolbox and enter this amount in the RGB fields, R:42 G:29 B:0 While holding the shift key click and drag to make your shape. To rotate this shape choose Edit>Transform>Rotate and then click on a corner of the bounding box and rotate your shape. Click the check in the options bar to apply it. If you want you can lower the opacity for the directions layer, I set mine to 75%. 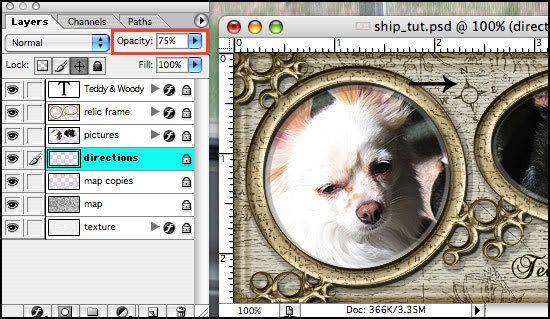 And you're done. To save this signature use the save as a jpg in Photoshop setting found here, My settings. |
|


