Jen
Creative Chick  Admin
Admin
Posts: 8,309 
|
Marbles
Oct 2, 2009 10:25:40 GMT -6
Post by Jen on Oct 2, 2009 10:25:40 GMT -6
Make copies of this layer and use the move tool to place the shines over your marbles. If you want you can make copies with the move tool while holding the appropriate key the same way you did to make copies of the rings. When your shines are in place link and merge the shine layers together. Set the blending mode for this layer to Screen in the layers palette. Name this layer shine.  |
|
Jen
Creative Chick
Admin
Posts: 8,309
|
Marbles
Oct 2, 2009 10:25:59 GMT -6
Post by Jen on Oct 2, 2009 10:25:59 GMT -6
Add a new layer and place it under the shine layer. Choose the elliptical marquee tool and change the Style back to Fixed Size and enter 68 for the Width and Height. Click down on your file. 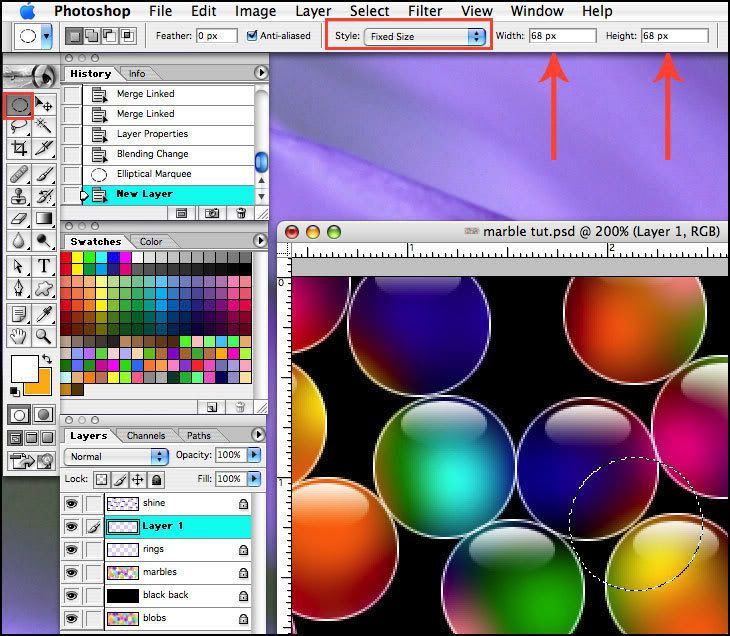
|
|
Jen
Creative Chick
Admin
Posts: 8,309
|
Marbles
Oct 2, 2009 10:26:24 GMT -6
Post by Jen on Oct 2, 2009 10:26:24 GMT -6
With white as your foreground color choose Edit>Stroke>1. Deselect. In order for your marbles to have the glassy look you need to position this ring in the correct location. If you look at the picture the inner ring is the one you're placing. Make copies of this layer positioning the rings in the proper location for each marble. If you need to make minor adjustments, with the move tool selected use the arrows on your keyboard to move the rings.  |
|
Jen
Creative Chick
Admin
Posts: 8,309
|
Marbles
Oct 2, 2009 10:26:46 GMT -6
Post by Jen on Oct 2, 2009 10:26:46 GMT -6
When you have all the inner rings in place link and merge the inner ring layers and name this layer blurred rings.  |
|
Jen
Creative Chick
Admin
Posts: 8,309
|
Marbles
Oct 2, 2009 10:27:09 GMT -6
Post by Jen on Oct 2, 2009 10:27:09 GMT -6
To the blurred rings layer apply Filter>Blur>Gaussian Blur with this setting.  |
|
Jen
Creative Chick
Admin
Posts: 8,309
|
Marbles
Oct 2, 2009 10:27:32 GMT -6
Post by Jen on Oct 2, 2009 10:27:32 GMT -6
Change the opacity of the blurred rings layer to 75%. 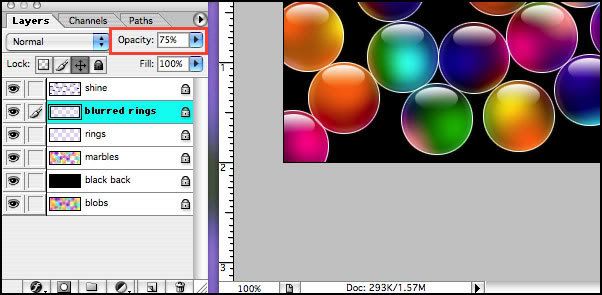 |
|
Jen
Creative Chick
Admin
Posts: 8,309
|
Marbles
Oct 2, 2009 10:27:52 GMT -6
Post by Jen on Oct 2, 2009 10:27:52 GMT -6
Now click on the rings layer and change the opacity to 20%. Setting the opacity to 15% works better for some colors. Try both and see which works best for you.  |
|
Jen
Creative Chick
Admin
Posts: 8,309
|
Marbles
Oct 2, 2009 10:28:11 GMT -6
Post by Jen on Oct 2, 2009 10:28:11 GMT -6
Go to your Channels palette and load the rings selection. You do that the same way you select what's on a layer. Put your cursor where the red arrow is pointing then hold the command key for Macs and the control key for Windows and click down on the layer one time. The other way to load it as a selection is to click on the rings selection channel, just like you do to make a layer active, then click on the icon at the bottom of the channels palette that looks like a dotted line circle. Don't panic when your file turns black and white. Once the selection is loaded click on the RGB channel.  |
|
Jen
Creative Chick
Admin
Posts: 8,309
|
Marbles
Oct 2, 2009 10:28:49 GMT -6
Post by Jen on Oct 2, 2009 10:28:49 GMT -6
|
|
Jen
Creative Chick
Admin
Posts: 8,309
|
Marbles
Oct 2, 2009 10:30:02 GMT -6
Post by Jen on Oct 2, 2009 10:30:02 GMT -6
If you want your background to be something other than black it's now okay to add a new colored layer and place it above the black back layer in the layers palette. Click on the marbles layer and apply an Inner Shadow to it with these settings. To get the color I used click in the box the purple arrow is pointing to.  In the Color Picker window enter the settings with the red outline and click OK.  |
|


